Showing posts with label metal letter. Show all posts

Thursday, August 2, 2012

Bride and Groom Moss Initals


Howdy. My little brother got married a bit back {last month} and I thought I'd share a simple, cute and {eh-hem} cheap way to personalize any sort of shindig you might be hosting.

First. You might be inclined to purchase the metal letters from our shop {HERE}. I did.
Second. I painted said letters green. This just happened to be the green I had available- which didn't require me to change out of my sweats or load up four children in the 100 degree heat and hit the local Lowe's. You can use whatever color you'd like. I did this just-in-case I missed a spot with the moss, or if some fell, or whatever.


  I'm showing you to paint the side that would be facing you- rather than the backside...I think. ;)


Here is the moss that I used. It came in a cute little package. {I actually purchased THREE because I didn't want to have to venture out again (see four kids spill up above).} I found this cute little package in the floral department. I can also tell you that if you are doing a few letters 2-4, for example; ONE package will suffice.

I simply sprayed the painted letter with Elmer's Craft Bond and held the moss in place over the moss, on the letter. I laid out all of the moss {which is why I have craft paper underneath} so that I could pick and choose moss. I assembled the moss probably like one would assemble a puzzle or a rock back splash or whatever.


Here are the two letters finished. I flipped them over after an hour {surprisingly cushion-y} and applied hot glue and a ribbon.

 Be mindful of the length of ribbon and where they will ultimately hang. This would be a sad place to not finish the way that you need it to. ;)


 And there you are. A few letters, a few steps and fewer dollars than on typically might spend!

Another Yarn Tutorial over at MMMblog, today!

Thursday, May 24, 2012

Mom 4 Real - Jessica's

I have been looking for just the right material to make an EAT sign for my kitchen for ages!  I made one out of vinyl, but I just didn't love it.  I've scoped out wooden letters at Michael's and Hobby Lobby, but they didn't do it for me either.  So, one day, I'm cruising through my facebook stream, and up pops these fabulous metal letters from Mindy Mae's Market...they were perfect!  I ordered them quickly, and was so excited to finally have the perfect letters to start my dining area makeover!


Aren't they fabulous?  The picture doesn't do them justice either.


The minute I put them up, I knew I wanted to redo the entire look of my space.  I grabbed some of my shells from last years trip to the beach, pulled my silver pieces out of storage, painted some plates with chalkboard paint to hang, and made a coffee filter wreath to hang on the wall.  The colors are so soft, and the EAT sign really pops off of the wall!


I put this little vignette together in the center of our table.  I painted the inside of a mason jar and plopped some flowers down in there...adorbs, right?


The last thing I did was tackle the top of my china cabinet.  I filled a large candle holder with wine corks, then cut some roses from my garden and put them in a julep cup.  I placed my silver platter and pitcher together, then added the K glasses that I etched, and added some candle sticks.  I just love the way it all fits together!


I love how crisp everything looks now...just in time for lighter summer living!


Doesn't my little EAT sign make you want your very own?

Friday, May 18, 2012

Nikki's Niche- Metal Letter...Craft Fail...

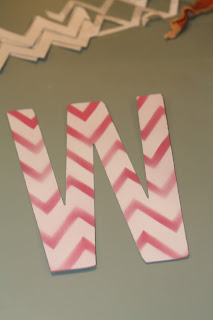
Lest you think ALL crafting is perfect...I thought I'd show you my latest and not so greatest. I had this vision of a darling Pink and White Chevron 'W' on a burlap wreath I had made (without taking pictures {GASP!})

My Silhouette isn't working...so I resorted to the "old school" way of cutting vinyl. I printed out the shape from my Silhouette first.

Then I made sure it would fit my vinyl piece and my pre-painted letter 'W'.

Then I began cutting- note the safety scissors. These are the result of  more haircuts, furniture slashes and rock-star-esque wardrobe re-dos. At least I'm safe.

Now. Take note. What you see here IS NOT what you'll get. You'll get the opposite. This, my friends is what I WANTED it to look like...{sigh}.

I was soo anxious to start...I decided to PAINT it instead (the vinyl was more than I was ready for tonight). I took the letter outside, placed the vinyl - with backing still on it- as a template and sprayed.

This is what I got. Opposite of what I wanted. Boo.

Here is the wreath it will reside in after I redo the paint...

Happy Friday All...I bet you need it as much as I do! ;)