Showing posts with label ideas. Show all posts

Monday, August 13, 2012

What I will be doing....

I will be heading up a couple projects...and wanted to share my tutorials ahead...so maybe we can do them together!

The first is a bank system for my children. We will be re-starting our chore chart/monetary system again and I really like this option- this tutorial, from Bits of Everything shows you how to make the crate and EVERYTHING!

I have a cute cushion for a Turning This Into That project that I need to finish...which involves covering a cushion...or TWO.  I found a terrific tutorial with Out Like Bandits.


And then, like Funcycled, I will be repainting a hutch. {Mine's a little smaller, however.}


Busy week of projects and classroom-organizing! School is quickly approaching!

Monday, August 6, 2012

Thumb-body Loves You!


I love this thumbprint necklace that I found {Here}. I just couldn't justify that kind of cost for it. 

I decided to make my own...times four. My little brother used to make me necklaces to match my more casual dance outfits when I was in high school. He used to roll the bead with craft clay that he would bake in the oven. He used to make all sorts of things. Which gave me an idea....

I headed out and took a gander at the local craft store and found me a couple of clay colors that I fancied.


I returned home and pulled out some parchment paper, a rolling pin, a cookie cutter {of sorts}, some letter stamps and the clay.
 I pulled a portion of the clay out of the package and I started to knead it- just with my fingers until it was more pliable. When it warmed up I rolled it out with my rolling pin on the parchment paper.

 Once it was rolled out, I used my lid to cut a circle out and called my little ones to do their part.


I had my kiddos wash and dry their little hands- mainly because they had been eating Cheetos and I though I love orange, I didn't want this one THAT orange.

I had the girls press their thumbs in the pearl colored clay and the boys on the metallic gray.
 Once they were done leaving their imprints I stamped each of their charms with their nicknames. {Something to consider: I put the letters on the side that will end up being upside-down to everyone else. Be aware of the letter stamp direction and readability.}
 I wanted to make sure that the necklace holels were big enough. - Double check yours- and I removed the toothpicks from the charms before I put them in the oven.
 I put the charms on the same parchment paper I had rolled and cut them out on on a cookie sheet and put it in the oven for 10 minuted {at 300 degrees}.


 I picked this one up off the cookie sheet almost immediately- look how cute!

 Here's the four of my charms together. I love it! Way less expensive than the metal version, easier to make and faster, too!  Just my style. ;)


 Check out MindyMaesMarket.com to see which vendor's product is up now!

And our blog: MMMblog  for our ORANGE ideas this week!

Thursday, August 2, 2012

Bride and Groom Moss Initals


Howdy. My little brother got married a bit back {last month} and I thought I'd share a simple, cute and {eh-hem} cheap way to personalize any sort of shindig you might be hosting.

First. You might be inclined to purchase the metal letters from our shop {HERE}. I did.
Second. I painted said letters green. This just happened to be the green I had available- which didn't require me to change out of my sweats or load up four children in the 100 degree heat and hit the local Lowe's. You can use whatever color you'd like. I did this just-in-case I missed a spot with the moss, or if some fell, or whatever.


  I'm showing you to paint the side that would be facing you- rather than the backside...I think. ;)


Here is the moss that I used. It came in a cute little package. {I actually purchased THREE because I didn't want to have to venture out again (see four kids spill up above).} I found this cute little package in the floral department. I can also tell you that if you are doing a few letters 2-4, for example; ONE package will suffice.

I simply sprayed the painted letter with Elmer's Craft Bond and held the moss in place over the moss, on the letter. I laid out all of the moss {which is why I have craft paper underneath} so that I could pick and choose moss. I assembled the moss probably like one would assemble a puzzle or a rock back splash or whatever.


Here are the two letters finished. I flipped them over after an hour {surprisingly cushion-y} and applied hot glue and a ribbon.

 Be mindful of the length of ribbon and where they will ultimately hang. This would be a sad place to not finish the way that you need it to. ;)


 And there you are. A few letters, a few steps and fewer dollars than on typically might spend!

Another Yarn Tutorial over at MMMblog, today!

Tuesday, July 31, 2012

Just Milk It...

We have Party On! Designs sharing their DARLING milk jugs with us over in our SHOP.

I thought I would do some 'research' about how to use these cute touches in a celebration setting and then I thought, "Why don't I share"?  Because, believe it or not, Pinterest DOESN'T have EVERYTHING. ;)


UCreate Parties- Oh.My.Heck. Seriously love the use of the baskets, the soda crate, the good ole stand-bys of comfort desserts...homemade oreos, cupcakes and chocolate chip cookies. Pretty much reminds me of my grandmas house.


Cookie Mondays- This cute little bakery party is so sweet it will give you a toothache. From the mini chef hats to the play cooking to the layered cookie birthday cake- you don't want to miss this!!


The Tom Kat Studio- One of Courtney's and my FAVORITE party-throwers, Tom Kat does it YET again with this adorable Milk and Cookies Birthday Party! Such cute touches and perfectly wholesome use of milk jars!


Kid Crave- This little party could double as a sweeter-than-sugar Valentine's Day soiree. A dash of brown and pink...could go heavy on either to lean towards or away from the fairer sex. Clean and classic- you can't go wrong with MILK. 


Smidge and a Pinch- You really need to stop here. I am loving the vintage birthday banner, the burlap-wrapped milk jugs, the use of retro milk containers and the simplistic but stunning cookie that say 'MAX'. This party is perfect...to the MAX. ;)

Wanna party, now? Stop by Mindy Mae's Market for YOUR Milk and Cookie party-starters.

Stop by Turning This Into That for some yarn-inpiration you may have been yearning for.


Monday, July 30, 2012

Turning Into A Shopper...

I'm not a big shopping fan. Not just clothes or home decor...food, too. I would rather do almost anything than go shopping. Scrub the floor...done. Pull some teeth...done. Clean the toilet- even that.

However. I must admit. I dooo love perusing Etsy, Shopify and the ever popular Pinterest. Usually its for inspiration or to find things {let's be honest} I can copy and do myself. However, I've decided to practice shopping without any additonal action on my part...and you get to come along. :) 

These Twinkle Sparkers from Giant Dwarf would be terrific for my soon-to-be 10 year-old going back to school. She's kinda growing out of the bow stage but still need something pretty but not too over-the-top. Plus...I could "borrow" them!

I've seen a lot of Mr. and Mrs. things around...and some His and Hers. I saw these Couple Keychains by Jewelmint and thought how cute it would be to give my Mr. the key ring that says 'Hers' and that I could keep the one that says 'His'. Maybe I'm behind the curve {which is typical} but I LOVE that.

We are creating a cottage-y feeling home and I really love to include industrial elements. We've pulled some in from all over. I would love to include some of these metal wire cages to cover some of my lights. This one is from Industrial Rewind and the price is perfect.
How about this great idea from TJLovePrints? This is a thumb print tree for a baby shower! I have a few of these coming up {eventually} in my future, as an auntie and I would love to use this as a keepsake for my SILs!

The last on this listing is this 'National Safety Town Instructor' t-shirt from RareAves. I'll be teaching 7th grade Engineering Technology this next school year and I thought this might be a funny {though unappreciated} touch to the Safety Unit I will be leading the first weeks of school.

That was fun! Pretty harmless- so far. Let me know...what are some of YOUR favorite Etsy shops? Maybe we'll have to do some door-to-door {so-to-speak} visits of them!


Thursday, July 26, 2012

Turning Into A Train Party...Part III


The last of the party details (that we can show with pictures) consist of the goodie bags and a cute addition made by Courtney's hubby.


Our goodie bags were bandannas made to look like something a train-car rider would use (is it PC to say 'hobo'?) We thought we'd forgo the sticks as that at 3 years of age most things are turned into some sort of weapon or device of destruction. ;)


Inside we included some 3 year-old favorites: train whistle, bouncy balls, bubbles, a little snack and some sticky-making suckers.


Look how completely adorable this ladder was for this party!  It worked perfect for holding our bandannas and for hiding the awning columns...or at least dressing them up a bit!

Over at Mindy Mae's blog we'll have another burlap feature from our Saturday link-up!

And some NEW items featured in our store and on facebook!

Wednesday, July 25, 2012

Turning into a Train Party...Perfect Printables!


Chugging right along with our Train party... here were some of the lovely printables that were used (and now available through us in shop- contact us at mindymaesmarket{at}gmail{dot}com for more information about them)!


This party wasn't without hiccups- Mother Nature was working against us. We had terrific wind and our light sprinkle wasn't so light towards the end of the party (or when people decided they'd had enough). We didn't get to fully utilize the beautiful pennant banner, the "Happy Birthday" banner and a couple of other "finishing touches". Our beautiful cake also ran late and so our spread wasn't fully complete for a while.
It was in a terrific location, however! We'll show you some of the other touches to the party tomorrow...

In the meantime- check out the theme for this week's Link-up over at Mindy Mae's blog.

Tuesday, July 24, 2012

Turning into a Train Party...Food First.


Courtney's and my first attempt at putting on a party. We wanted to go low-key so that we could notate our mistakes and things we wanted to change -without the guest of honor killing us. We chose Courtney's nephew's 3rd birthday party. I thought I could outrun him if things went terribly wrong.

Today I'll show you the food we served. Keep in mind it was for 3 year-olds, at a park and that we had a rain storm spontaneously in the middle of it (through the end).

We served animal crackers for two reasons: they were portable and they are one of my favorite.  Just kidding. They are already packaged in their own little train cars!
We served "train wheels"- which were all going to be black wheels but I was told that variety was the spice of life...so we had both.
Sandwiches and chips- a crowd favorite...we pretended it was the favorite choice of train engineers everywhere. Cause it is...right?!
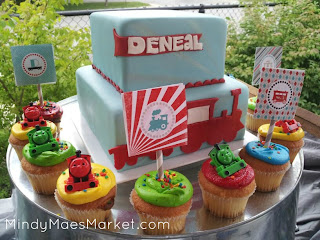
Cupcakes are a must-have. Especially the ones that turn your teeth awesome colors.
Extra goodies placed around the place to keep peoples mouths busy. These lanterns {from IKEA} just seemed like a perfect addition to the decor.
And the cake! So cute and so yummy! We had a Mexican vanilla layer and a Oreo layer (or train wheel layer). It was fabulous tasting!

We'll show you some more later...I gotta get off my computer. It's Pioneer Day here in Utah- we are supposed to be doing Pioneer things today (making our own bread and butter, bobbing for apples, etc) and the Internet wasn't a pioneer activity (stinks to be them).