Showing posts with label paint. Show all posts

Monday, August 20, 2012

DIY Pallet Signs!

 Courtney's cute mom saw a darling wood plank sign of a pink elephant a bit ago. She really liked it. But the elephant was pink...it only had TWO legs and it had a hefty price tag.

So, the two of us decided to make her one- exactly the way SHE wanted it and for WAAAAY less money.

It began this way:  Home Depo wood planks for $.97/ piece. Cut to size- we'll be able to use the scraps for another project- we really actually didn't spend that much on this board. We cut them (more specifically Mr. Fabulous did).

We assembled them will additional planks and some nails.


 We ended up with this LOVELY 4'x3' bunch of planks, ie, blank CANVAS.....


We started painting. We started with ivory spray paint. Just a heads up. The paint SOAKED into the wood doing almost nothing. We tried spray paint primer...yeah right. We went BACK to Home Depot and purchased paint...mixed by the sweetest older gentleman. We bought some rollers and started again.

It worked terrific and it all went pretty fast!


When it was dry (two minutes later) I started sanding the boards for that "antiqued-vintage" look we were going for.


After the sanding, we stood the board up, darkened the garage and then using a projector to project the exact elephant image we wanted up the on the board, started tracing it onto the board.


We brought it inside to my kitchen and started painting the elephant! We had debated over what type of brush to use. We bought all different kinds and ended up staying with what we knew best- foam brushes! It was the right choice. It gave us the control we needed to keep lines straight but also the ability to show some of the wood's 'character'. 


We did touch up with a smaller brush, though. Note the eye in this picture compared to the finished elephant eye. It was nice to have that option.


After the paint dried, we sanded again. We wanted it a little distressed- but not a whole lot.


Here's the finished product! On it's way to Countney's mom!


It's TULLE this week on MindyMaes Blog! Head over there for some cute ideas!

Tuesday, August 14, 2012

Turning This Into That....Re-Do Children's Hutch


I'm gonna two-part this sucker because of the number of pictures.
Don't want you falling asleep on me. It's a boring hutch to Shabby Chic Sweetness!

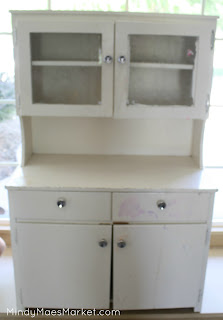
We were given this cute little hutch for a birthday a couple years ago in this condition...


Yes. I know I should have re-done it before now....

My four year-old loves this grody thing and asks me to make it pretty all-of-the-time. My negligent decorating hasn't stopped her from playing with it and storing her most valued possessions in it{lip gloss, mostly}.


So it begins...now. I took it apart; hardware, drawers, doors. Trying hard not to be grossed out by the dried-on food and whatever else was now cemented to every part of this {cute, right?} hutch.

I commenced sanding. I am sanding in my family room. I was too tired to drag it outside and the carpet is on it's way out, anyway. It seemed more fun to do it this way...kinda rebellious. I won't lie. This thing took like three different sanding sessions. Every painted layer seemed to be less thick than the one before it, but with more dried-on drips. To get it back to smooth was a chore.
I took all the parts outside and primed them with Valspar spray primer. Can I just say how much I love that primer now comes in spray paint form? A.TON. It took me about three layers of primer, too. A good deal of exposed fake wood was present after my sanding and we had to help it all take on some paint.

I primed the hutch itself and was so {ehem} pleased to find that the whole back of the cabinet was made of particle board. Not the best for painting or avoiding splinters and slivers.

I then began spray painting the hutch with Valspar's 'Ballet Slipper'. Kinda giddy that I'm STILL spray painting. It's soo much easier than painting with a brush- perhaps it's just the fumes I'm inhaling? Three sprayed on layers, as well.

So three seems to be my magic number with this little get-up. Three trips to the store for paint, too!  Here's the painted hutch...for now. Tomorrow I'll show you the cute backing and the darling hardware
{from MindyMaesMarket.com of course}!

Wednesday, August 1, 2012

A Little Something For The Birds...


It's getting to be THAT time of summer. When mom just wants school to start and the kids have exhausted just about every creative thought about what to do for the day. This activity was earlier in the summer. We still had lots to do and more ideas to conquer.


 We started with left-over soda bottles that I had been keeping for just such an activity. We gathered our acrylic paints, some plates {for said paints}, some brushes and some sticks. Sticks. So simple, yet such a main staple of our play repertoire.

We cut holes into the bottles (I did the cutting and no was was willing to help with the picture-taking.) with a stake knife and make 'x' cuts to stick the sticks through- they should go in one side and all the way through to the other side- to give additional balance, I suppose.


After my traditional, "if you get it on your clothes it won't come out", we commenced painting. The paint adhered rather well and we had not one drop on our clothing. ;)


When they finished, we had a lovely assortment of painted plastic re-purposed bottles.

We used 22-guage metal wire to wrap around the tops of the bottles and around the balconey rungs. They've lasted the rest of the summer....

This is right outside our kitchen - we have face the table to look directly out over these cute bird feeders. We may have to head to the library now so that we can identify our little friends!

Friday, June 1, 2012

Nikki's Niche- Bathroom Sign Repurpose

Here's a pre-silhouette-esque tutorial for you.... Something for EVERYONE to do with the simplest of tools....paper, printer and a STEAK knife! Yeah, you read right.

I started with a bathroom fixture...not sure how I got it or where it came from. It was a little too flowery for my husband's taste...
I started by spray painting this part turquoise.
While that dried I washed a section of a military parts sorter that we've used for a variety of projects in our house.
It used to be a divider between some shelves.
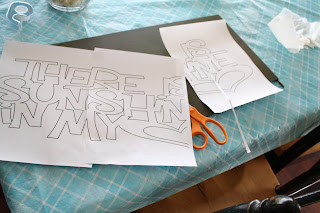
I printed off a a design {which, yes, is from a silhouette} in segments so that it was big enough to cover the area I wanted to paint.


I taped it down to the metal so that it wouldn't move.
And then, using the stake knife you see in the upper corner of the picture, I preceded to cut the letters from the paper. To be honest, it worked fabulously!
I painted the letters with acrylic paint- probably not my best choice (I'd love advice on other options for next time).

I wanted a little more color ...so I reapplied the paper pieces and took it back outside to spray paint.
It certainly looked more "rustic".
I took a sander to it.
I was pleasantly surprised to find a little red under the green paint.
We trimmed the edges a bit so that it would fit better into the center of the holder.
And here it is...the first of my downstairs bathroom...stencil-cut with a steak knife and painted with dollar-store brushes.

Monday, May 28, 2012

Nikki's Niche- Fabric Scrap Desk Hutch

I started this post a bit ago...in segments. When I went to download this tutorial, mid and end segments were gone! {gasp!}
(Along with the puppy photo-shoot I did with my sister-in-law. Whoops.) So for the sake of time I'll show you what I've been up to!

I've had this desk hutch for a while and I wanted to dress it up a bit.  I started with some left-over purple paint.

I finished with the purple and added some touches of pink...why not?

(Here's where I lost my pics)  I pulled out my spray adhesive and scraps of fabric that we have every now and then on Mindy Mae's Market.

I arranged the fabric on the cork board first, to give me an idea of how it might need to lay.
The I went back with the spray adhesive, which I sprayed directly onto the back of the fabric and attached it layer by layer.


Here's the finished product. I'll be honest- I added some ricrac and fabric lace tape around the perimeter of the top portion....and ended up taking it off. It was just a little too much.

It's colorful and fun in a place that wasn't before and I'm excited to use it now!