
First and foremost, please don't judge the photos! We couldn't find our SD card and ended up using my phone and that was before Instagram was available on Droid, so I couldn't even fake it! :)
Things you'll need:
Frame (size of choice) with glass
Silhouette or other vinyl cutting machine (can do without as well)
Large desk calendar and/or a ruler.
Dry Erase Markers
For ours.. we used my bridal picture frame! You know, that large picture of yourself you display at your wedding as if you aren't standing right there..
Well the hubs wanted to hang it, and that was a solid no, therefore it had been sitting under our stairs putting a perfectly good frame to no use. So we ripped out the picture and got to work.

Here it is after ripping out the picture and tearing off the backing.

Clean your glass really well.
{I was out of Windex so we used Lysol, don't judge!}

Place your frame face down {so that the pin striping is on the backside}.
Place your calendar sheet wherever you'd like it placed within the frame and start tracing the lines with your pin striping.
We suggest when you are pin striping to do the horizontal stripes first, then your vertical. That way you have clean lines when looking from the front, because you can hide the ends of the vertical striping on the horizontal stripes.

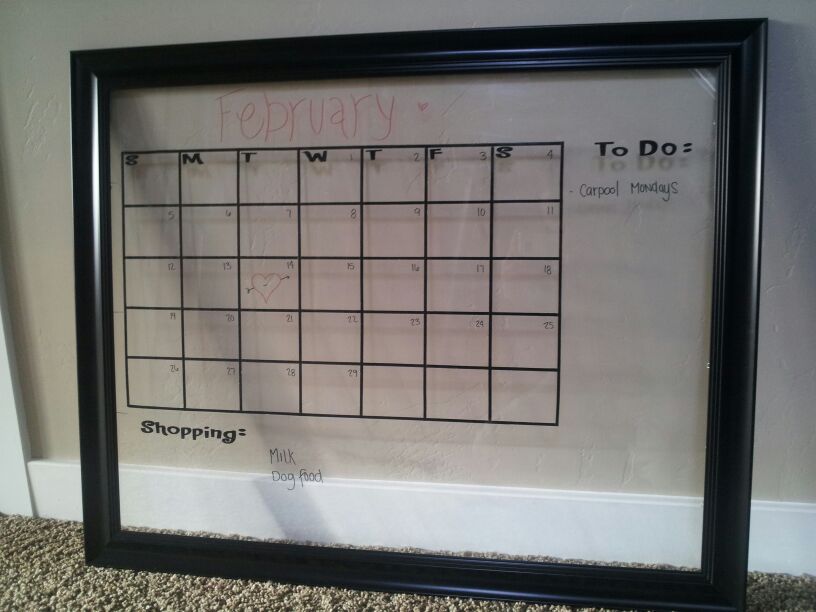
When we were done with the pin striping we printed out the days and a couple of "side-notes" for our frame. If you don't have a vinyl cutter, just write it in!
No biggie!
Remember, you'll want to cut them so that they are sticky on the front side, so that you can adhere them to the backside of the glass.
Then grab your dry erase marker and get to work!
The plus side of doing all your vinyl on the backside is when you clean the glass to move onto a new month, you don't get dry-erase dust stuck to the vinyl and it is a smooth surface to work with.
As most of you know, I {Courtney} don't have kids.. so Carpool Mondays was simply for effect ;)
xoxo
No comments:
Post a Comment